.png)
Everything You Need to Craft the Perfect Sticker
- Jul 31, 2024
- 9 min read
Updated: Aug 1, 2024

I am an avid Google-er. I constantly have random questions popping up into my head so of course I am always reaching for my phone to research my thoughts. If you could see my search history, you’d be scrolling for a while everyday.
When it came to starting a sticker business, I did a lot of research before getting started. And by a lot, I really mean a ton.
I saw that I could order my designs as stickers through an app and within a split second I thought, “I could probably make those myself”. That was the beginning of opening my own sticker shop and the research snowballed from there.
I wanted to learn exactly how I could make the best stickers from home which then turned into learning how to start a business and sell them online. I can expand on all of that later, for now I wanted to share the products that I use to make my stickers just in case someone out there is trying to figure out how to make stickers too.
Create a Budget
First thing’s first, you must decide how much money you can and are willing to spend on making stickers. You can find fairly affordable options but you may have to settle on lower quality stickers. Perhaps you splurge on a really nice printer but test out some cheaper paper options first. Or maybe a friend has a printer they don’t use anymore and is willing to gift it to you or sell it for a cheap price allowing you to spend a little more on high-quality paper. It’s really up to you on what you can afford and how you want your stickers to turn out.
I will say, with starting a sticker business, no matter how little or how much money you spend on materials, there will be a lot of trial and error to get everything working properly. So maybe test out some different options before spending a great deal of money on something you might not use later.
Sticker Paper
Choosing which sticker paper to use was a tough decision for me. There are so many different brands out there between Avery, Koala, Online labels, Joyeza, and so many more. Then do you pick vinyl sticker paper, or paper, maybe polyester? And then, do I want the paper to be matte or glossy?
You must decide overall what type of paper material you want, the finish, the color, and how durable you want the stickers to be.

I order both glossy and matte sticker paper that comes on thick, weatherproof, vinyl-like paper. I use both the Online Labels Weatherproof Gloss and Weatherproof Matte Inkjet 8.5” x 11” Blank Label Sheets.
The price per sheet varies depending on the quantity you purchase. For example:
50 sheets of the Weatherproof Gloss Inkjet paper is currently $1.39/sheet or $69.36 total while 100 sheets is currently $1.24/sheet or $123.73 total.
50 sheets of the Weatherproof Matte Inkjet paper is currently $0.88/sheet or $43.88 total while 100 sheets is currently $0.73/sheet or $72.87 total.
Although the price per sheet decreases the more you buy, if you’re on a tight budget, it might be best to order smaller quantities so you don’t waste money if you don’t end up using all of your sticker paper.
I have found that Online Labels is an excellent option. The price is on the higher side in comparison to some other brands, but the quality is superb. Both the weatherproof glossy and matte paper are great options to make your stickers last. Online Labels weatherproof sticker paper comes with a waterfast inkjet coating and a strong adhesive making the stickers waterproof, and resistant to tearing, smearing, and peeling while difficult to remove. This is exactly the type of paper I was looking for to create long-lasting and durable stickers.
Lamination Options
Laminating your stickers is an optional step. I actually only laminate the logo stickers that I print for businesses because I want them to be extra high-quality and durable. The weatherproof paper I buy doesn’t necessarily need to be laminated. I have created several stickers without lamination and tested them out on a water bottle. I’ve taken that water bottle to the beach, the river, hiking, boating, I’ve washed it in the sink and the stickers hold up great. They’re still vibrant and forcefully stuck to that bottle. There is just something about selling hundreds of custom stickers to businesses that makes me want to laminate them to be extra cautious.
Now if you’re using a non-waterproof sticker paper and you want your stickers to be waterproof, laminating your stickers is crucial.
There are a few ways you could do this:
Self-adhesive laminating sheets that you stick right onto your stickers by hand.
Thermal or heat laminating but using a hot lamination machine.
Using a protective UV and waterproofing spray.
I use a hot lamination machine to laminate my stickers.
I don’t have the most steady hand and find that using self-adhesive lamination sheets is a bit of a challenge. However, it’s definitely a doable option if you’re able to get the technique down and line up the lamination sheets with the sticker paper properly.
I have also tried to use a protective UV and waterproofing spray but the stickers felt flimsy, you have to spray multiple coats at the right distance, and you must do it in an open area because of the spray can fumes. I have cats and dogs so there is pet hair everywhere that would get sprayed onto the stickers. This also felt like the most time consuming option because you have to wait for each coat to dry before applying the next.
I purchased the Scotch TL902 Thermal Laminating Machine for $30.99 and a 100-pack of the Scotch 3 MIL Thermal Laminating Pouches from Walmart for $29.04.
These can also be found at any local Target, a office supply or craft store, or on Amazon.
Lamination film comes in a variety of thicknesses. Formax Printing Solutions gives us some great examples on the different options each variation could be used for. For example, 1.5 MIL film is relatively thin and good for printing on thick card stock for things like business cards while 5 MIL film is strong and sturdy, best for flat items that get handled often such as bookmarks.
Inkjet Printer
There are two primary choices between printers when it comes to making stickers; an inkjet printer, or a laser printer.
An inkjet printer deposits ink directly onto the sticker paper to print the designs.
Inkjet printers can produce vivid, photo-quality images that are beautifully eye-catching. Inkjet printers are a great option if you’re looking to create bright, colorful, and clear stickers. However, inkjet printers take longer to print, may need extra time to dry depending on the paper you’re using, they run through ink quickly, and if you’re hoping for waterproof stickers, you’re more likely to need additional waterproofing techniques such as lamination.
A laser printer renders images by using a combination of heat and toner.
Laser printers are almost the opposite. Laser printers are fast and efficient, they print crisp text including small fonts, they’re instantly waterproof as soon as the stickers are done printing, and the toner cartridge lifespan lasts a long time. The downfall to a laser printer is that they do not print images as well, they’re more expense, and the toner cartridges can be pretty pricey.
I settled on the Canon - PIXMA PRO-200 Wireless Inkjet Printer which can be bought directly from Canon or at Best Buy, Walmart, or on Amazon. I purchased my printer from Best Buy which is currently discounted down to $499 but is originally priced at $599.
The Canon brand of ink, Canon CLI-65 Eight Color PK is currently $104.51 on Amazon but you can also find this ink pack in a variety of brands such as Lomentics, Firstink, or Vowdicua on Amazon ranging from $85 to $90 instead. I have purchased this ink from different brands and they all work great. When shopping for an off brand, you will want to look for “PIXMA PRO-200 CLI-65” labeled on the box.
I went with an inkjet printer because I was looking to make vibrant stickers that looked as good as they do on my iPad. I have also printed photo images on stickers and the inkjet printer works like magic when it comes to printing the image clearly.
Cutting Machine
When envisioning a digital die-cutting machine with the ability to cut a variety of materials for any craft project, most people think of the Circuit. However, there are a variety of brands that make a cutting machine; Silhouette, VEVOR, and Brother for example. When deciding which option to choose, I primarily researched and debated between the Cricut Explore and the Silhouette Cameo.
Both machines have the ability to cut various materials, vinyl, heat transfers, paper, fabric, you name it! However, I have only ever used the machine to make stickers so I don’t have any experience using other materials.
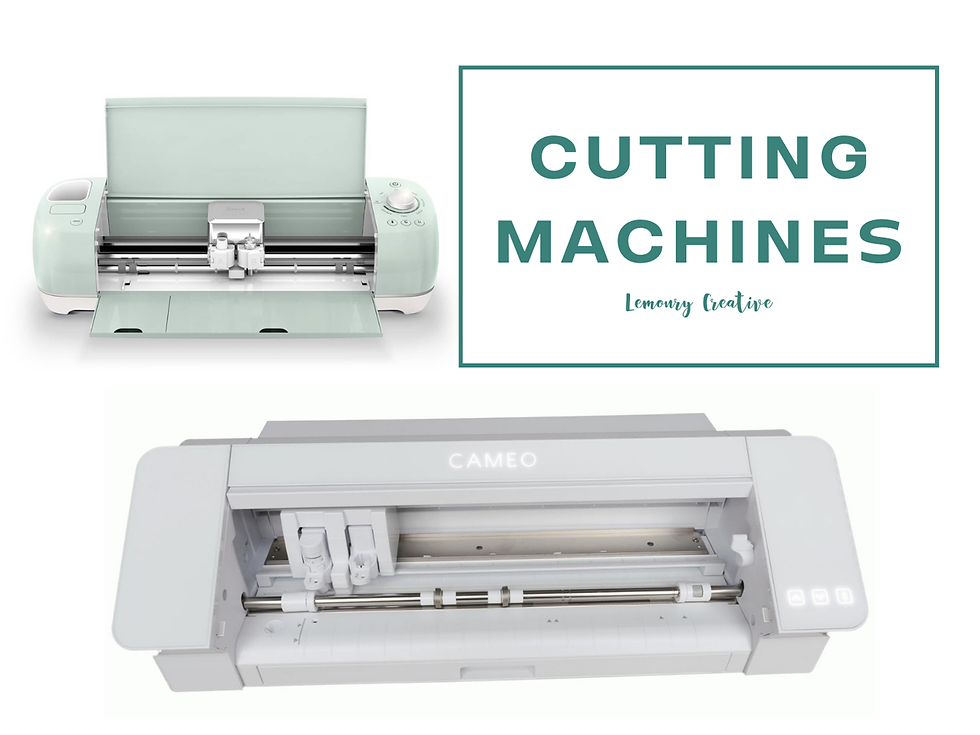
Details about the Cricut Explore:
Sturdier structure/build.
Cuts quietly and quickly.
Can cut materials 12-inches wide by up to 2-feet long.
Can upload any file type including .svg files.
Easy and simple to use for beginners.
Can create custom designs in the Cricut Software.
Must use a cutting mat.
Details about the Silhouette Cameo:
The machine is quite noisy when cutting in comparison to alternative brands.
Can cut materials 12-inches wide by up to 10-feet long.
Additional software upgrades needed to use .svg files.
Has a larger print and cut area to get the most stickers printed onto one piece of paper.
Advanced software with a large variety of features.
Includes a roller feeder to cut larger decals and vinyl rolls.
Has the ability to work on multiple projects at once.
After weighing all the pros and cons, I purchased the Silhouette Cameo 4. This can be found at any craft store such as Michaels, Joann, Hobby Lobby, or online. I purchased the Silhouette Cameo 4 with Bluetooth, 12x12 Cutting Mat, Autoblade 2, 100 Designs and Silhouette Studio Software from Amazon for $189.00. It came with everything you need to cut your first stickers.
I’ve noticed over the past two years of using this machine that it was a learning curve to figure out. I got frustrated a few times because it is more advanced but after several YouTube tutorials, I figured it out. Now it pairs perfectly with my Apple devices and I hardly run into any issues. I would say the only caveat can be the lighting. If I have my office window wide open with the sun beaming in, it creates a glare on the sticker paper and the machine struggles to to find the registration marks. But, this is an easy fix by either closing the curtains or moving the machine to a more shade area of the room.
Crafting the Perfect Stickers
This is what works best for me and helped me successfully create so many stickers for so many people. Let’s review.
Not previously mentioned, I create all of my designs digitally. I use ProCreate for the iPad which is a few design software and Canva Pro which is $120 per year. There is also a free version of Canva but I would say the Pro version is well worth the cost. Canva also offers discounts for teachers, students, and schools that one could look further into as well.
After designing my stickers, I format them using the Silhouette Design Studio to prepare them for printing. This is where I adjust the sizing and lay several out onto one page to get the most out of a sheet that I can.
Then, I print the stickers on either the glossy or matte Online Labels Weatherproof vinyl-like sticker paper.
If I am laminating the stickers, I then prepare two sheets of stickers back-to-back in a Scotch 3 MIL Thermal Laminating Pouch and run them through the Scotch TL902 Thermal Laminating Machine. Once they’ve cooled, I cut the edges of the pouch, pull the two sheets apart, and then prepare them for cutting. If I am not laminating my stickers, this step can be skipped.
Lastly, I line a sheet of stickers up on a cutting mat. I originally used the one that came with the machine but I have since replaced those. I generally purchase new cutting mats from my local Hobby Lobby. Specifically, I get The Paper Studio brand in the Standard Grip. There’s light, standard, and strong and after trying all three, I find the Standard works best. I found with the light adhesive grip the paper would slide off the mat and with the strong adhesive grip the paper would get so stuck to the mat it would tear. Cutting mats can range anywhere from $5 to $10 on average.
Once I get the sticker sheets lined up properly onto the cutting mat, I run it through the Silhouette Cameo 4 to cut them all out. I’ve done die-cuts, kiss-cuts, square, rectangle, circle, and all shorts of shapes and the machine works great. So if you're looking to make stickers that stand out, these are the tools I use and have found the most success with.

Sources
“Laminated Printing: Choosing a Laminate Thickness to Fit Your Project”, Formax Printing Solutions, (2014). https://www.formaxprinting.com/blog/laminated-printing-choosing-a-laminate-thickness-to-fit-your-project
Sam Zelios, “8 Best Sticker Paper Materials [Expert Picks for 2024]”, Online Labels, (2024). https://www.onlinelabels.com/articles/8-best-sticker-paper-materials?reward=OtM6%2fQNZyMRJamQV%2f0Y3%2fQ%3d%3d&#:~:text=1.,for%20making%20stickers%20that%20last
Comments